Wednesday, June 25, 2008

Quilted Tote Bag

I am going to be teaching a few classes at My Quilt Shoppe soon. I have posted pictures of the Victorian Applique Series I am doing in an earlier blog.
The other class is a Quilted Tote Bag from Jo-Lydia's Attic. It is really nice and roomy, measuring 15"high and 18"wide. It has 8 pockets, an attached change purse (which I use for sewing/painting notions) and a swivel hook for keys (or scissors). There are pockets inside on all four sides. There are also pockets outside on every side, one large enough to carry a cutting mat to class! It would make a great class tote, with all those pockets you can keep everything organized. I also placed a separating zipper on the top panel. You can unzip it completely so that the panel drops down inside the tote when you want easy access to your things. There is an eyeglass case pattern included with the pattern. Oh, and there is also a total of three tote sizes in the pattern.
It is called "The Quilted Carryalls".
I made one for myself out of pre-quilted batiks but needed to show one made from "quilt your own fabric"...so I picked something from the new fabric at MQS.
I choose three fabrics. One for the main side panels, a contrasting fabric for outside pockets and one for the inside of the bag (inside pockets). This is my progress so far.

This is all the things that I needed gathered together. If I were keeping the bag, I would have quilted batiks probably. But this fabric is nice as well.


I just quilted them with a simple grid pattern but it looked very nice after it was done. I just loved spending time with fabric, thread and my sewing machine!

And a close up of the quilted fabric. The pattern suggests that you cut the fabric and batting before quilting it as it goes much quicker than quilting the entire piece then cutting the pieces out. And it went very fast for me. I used a bone crease tool to mark my grid with. No markings to remove!

Hope you enjoyed this little blog about part of what I did yesterday.

This morning I took the last batch of Rust Fabric out of the bin! It looks beautiful! I also added quite a few different items to see how they would rust. Results later...

This afternoon I'm going to pick my niece, Kara, up and I'm going to teach her how to sew! I'm excited about this! I love teaching the next generation this craft. She has awesome taste in colors and design and I'm sure that she will choose beautiful fabric. We're going to make a tote bag. Not the one from above, I think that a true beginner needs one a little less involved. But I will show her how to mark it for the grid quilting...maybe I'll ignite the quilting fire in her! Here's to Kara!

Bird Crazy or Crazy Bird...

I had drawn a couple of birds the other night when Hot Flashes had me awake and looking for something to do. The very next day, I saw Birds on Praterposte (http://www.praterposte.blogspot.com/) and it made me remember a Bird Vest that I had made years and years ago. I rambled through my closet and found it! I never wear it but couldn't force myself to throw it out, it's Art, ya know.
I've posted some pictures of it. I saw the directions in a magazine but cannot remember the name of it...sorry! I did use my own modified vest pattern and, as usual, changed up the birds as well!

This is the front. I made it out of a soft muslin fabric. I fused the everything on and then did a little free hand embroidery on the edges. I attached and secured the fabric flowers with buttons. How cute was that?


And the back. I still love those long legged birds! I have a star on the back and a sun on the shoulder. I have a close up of the sun farther down.


Close up of one of the birds on the front. I love this button. I added seed beads for some of the eyes. What a crafty gal!


This is one of my favorite bird and flower combinations!

This is the left side of the front. The tallest bird was an All Star Basketball player in 1995...
And this is the Sun. It is located directly over the right shoulder.
Hope you enjoyed my little trip back to 1990's garment sewing!

Sunday, June 22, 2008

The Rust Bug

My husband has caught The Rust Bug! Ever since I made the first rust fabric, he has been collecting rusty items for me (or for himself if the truth be told).
A few days ago, we gathered up our growing collection of rusty tid bits, armed ourselves with our secret mixtures of Rust Energizer and got to Work.
We layered.
We spritzed.
We pondered over placement.
As he was studying over where to place each particular piece of treasure, I was itching to just throw all of it on the fabric.
His engineering brain was very methodical...
My Crazy Callie brain was running here, there and yonder.
He added one fat quarter of fabric...
I added a piece of vintage lace, a wadded up kimwipe, a bit of cotton string, a torn piece of loosely woven fabric.
He added a beautiful old gear from a meat grinder...
I added 10 rusty nails, a bolt, a washer and 5 pieces of an old bent & broken tin can.
So (and I say this with laughter in my eyes)you can see how well we work together.
Each of us appreciate and even envy the others creative spirit.
I stand back and watch him work in his exacting way,
my mind screaming,"Hey, try this! Try that!".
He moves out of my way
even as his mind is screaming "Stop!Stop!"
and, in the end both of our ways work,
very nicely I might add...
Very nicely indeed.
That must have been one of the pieces that I could no longer stand it on...I tossed a handful of rusty nails in for good measure!
If you look on the bottom left hand side of this fabric, you'll see the image of a beautiful old key. It wasn't rusty but it acted as a resist for what was under it. In the next picture, you'll see the other side of this fabric...
The key image is now in the upper left of the picture. It is shaped kinda like the key, but you would not recognize it as the same image, now would you? There must be some chemical action or reaction that causes each side of the fabric to look different. One side had the outline of the pieces that you use...while the opposite side of fabric will have the entire image appear as solid rust. Hmmm. it makes for some really interesting pieces!
Look at all the awesome shapes and colors in this piece. This is PFD fabric from Big Horn Quilts.
Vintage lace from my Grandmother's stash, kimwipe, cotton lace and a torn piece of loosely woven fabric.

Tuesday, June 17, 2008

Katie Girl

Well, read down a couple of entries and you'll see that I went to an awesome workshop in Saluda NC on Friday. It was sponsored by Random Arts (http://www.randomartsnow.com/) , one of my Two Favorite Shops. The Most Wonderful & Talented Artist Extraordinaire that was teaching was Katie Kendrick. Go see her fabulous Art Work at http://www.katiekendrick.com/ or keep up with her daily ramblings and adventures at http://www.joyouslybecoming.typepad.com/.
I am mainly a fabric, fiber, mixed media type person...I paint fabric...not faces...so this was new to me...and a bit scary I might add. But Katie made it all fun and quite the adventure! I forgot to take pictures of my own girl and now Jane has reminded me (not to gently either). So, I took some pictures and will go through them with you.
This is the inspiration for my Katie Girl. It was a sketch of a woman with this wild & crazy hair, quite pointed face but very lovable and fun.
You will see that she is far from completed. I haven't even worked on her since I got home...so very busy! But I WILL finish her!
The blob on her head will eventually be her wild hair. I plan on making it appear as if it is "swept up" on her head and the curls will be off the top of the canvas...And of course I'll add some white streaks. Gee, where did that come from. Now I guess I'll have to change the color of her eyes...bluish/greenish/grayish...Oh, I am playing with the idea of making the blob on her head a birdnest, adding a bird up there and calling her Bird Brain. Whatdaya think?
The curly thing at the top (coming out from her head) is one of those wild & crazy curls, not a snake as was pointed out to me...Hey, I could put a jewel on her forehead and then add a..well, nevermind that...
I'm still auditioning the fabric for her dress too. I had sewn on rust fabric for the sleeve cuffs, but that could possibly change also...I see a trend developing here.

Hopefully you will all recognize her when I'm through.


But if not, I'll be happy to reintroduce you all.

Doesn't she have really nice eye brows? I started the painting out with no eyebrows...her face COMPLETLY changed when I added them.

OK then...there you go My Katie Girl.

Happy now Ms. Jane?

Monday, June 16, 2008

Another Beautiful Katie Lady


I managed to snag a picture of Jane Powell's Katie Lady...or the lady that she painted in Katie's class (thanks Jane!). She actually painted two pictures. I'll try to round up the other one.
Enjoy!

Sunday, June 15, 2008

Well, I have tried about 10 times to upload these pictures in order but Blogger isn't playing nicely tonight. So, I am tired of messing with them. I have them up but they are not in order...I'll try to add a little blurb with each one. One other note, I can't remember everyone's name so I'll just put the names of the ones I know...and first ones at that! (gotta protect the innocent ya know).

Here she is, Artist Extraordinaire Katie Kendrick.

Again, Katie is demonstrating a technique , probably painting faces.


This was obviously at the beginning...look at how clean the tables were!

I think she was showing how to transfer images with gel medium. Awesome technique, btw.

My new buddy JanePowell. Another Extraordinary Artist.

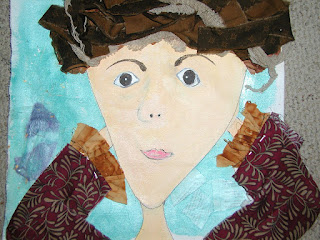
Katie showed us how she painted the bird face from a picture of her. So cool...

Katie is helping Mary with her technique.
These two lovely ladies (and quite silly I might add) are from Alabama. Their paintings rocked!
The guy here is David Turner from Spartaburg SC. His project was a little different from all of ours but very creative and gorgeous! He actually used the Kimwipes that I rave about in an earlier blog (www.ebay.com item#300232349329). He waded them up, soaked them in paint & water, stretched them out, dried them with hair dryer -three times and then attached them to a canvas, painted/stamped/collaged several other items to it...and it never tore , ripped or ran away. I'm telling you, these things are an awesome tool for mixed media/fiber art/book making/collage...you name it, they will work in some way.
I'll go ahead and post his project pictures. Look at the texture on the background, that's the Kimwipes. He has (or works at? not sure which) an art store in Spartanburg SC, Art & Frame Store (www.artandframegallery.net). Go visit it!
Meow! It's a Turtle Cat...or is that a Cat Turtle?!?
Kristi's girl (that looks a lot like her!)
Wow! Kristi had time to do two paintings!
This is an awesome painting by one of the women from NC (for the summer anyway). It's a pic of her and her dogs. Notice the tapestry of fabric behind the painting...she was going to sew this together later.

I love the little bird! The lady that painted this is a Stamper that said she would definitely be painting and embellishing a journal after taking this class. Great colors!

This is Mary's grandmother, I think...or her aunt? She also had time to paint two people. I love the background color!
This was one of my favorites! Meg Fowler did this. It is a night time painting (unfinished, I took pics early) of a woman that changes in to a tree at night. You should see it in person! She has used a fiber collage for the bodice, stuffed foam under it to create dimension. She added so much fabric and texture after I took the picture, it's unbelievable! I want to see the finished project. Hopefully they will go up on Random Arts website if we all send in pics of them...
Don't you love that hair?! This lady also added a lot of dimension, in fact she added a small basket at the bottom.
Eve! It's Eve with a string of leaves in her hair and skeleton leaves for a bodice! The background colors were beautiful...shimmer and sparkle galore.


Everyone was unpacking their stuff, giving shout outs to the folks across from them. There's Meg (with her hands on her hips).Jane blogged about her at Random Arts blog (www.randomartnotes.blogspot.com). She is an awesome artist!

Notice how the tables got progressively messier...
You can see the very bottom of mine on the table closest to you i this picture. I forgot to take a pic of mine. I'll try to add it later.


This is the wall hanging that Katie used to demonstrate all the techniques on in class. Man, isn't she an awesome artist?


The top two pictures are one of her Art Dolls. Look at the eyes...beautiful eyes, so expressive.

My two new friends, Krisiti and Jane. Love your work guys!
Ok, nuff for tonight.